Saturday, March 21, 2020

Week 5

Week 5: Activities 

This week I made models of my workspace in both cardboard and paper at a 1:10 scale. Here are the two models I have constructed, both of which had varying degrees of success.
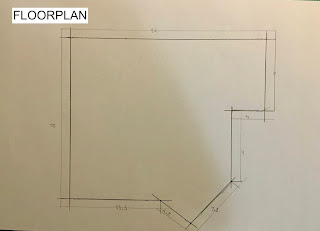
Here is the floorplan which I worked with for my room. I used small tabs on the side to connect the walls to the base using glue and masking tape.


The paper model is not a sturdy model and was extremely annoying to put together completely.

I found cutting was extremely fragile and gluing was tedious as I did not want to leave glue marks on the walls or the base of the model.

The cardboard model was far easier to construct as the base and the walls when putting pieces together were sturdy.

I also spray painted the entire model black to allow for the aesthetics of the model to be increased as there were marks on the old cardboard I used. 

This will also help with taking photos of the model on a white background as I will have a contrast of black and white.
Saturday, March 14, 2020

Final Images

Final Images:

Here are the final images as a group we created. I bought the infographic data visualization image and the site plan to show movement-image together on illustrator.


Wednesday, March 11, 2020

Week 4

Week 4 CRUNCH TIME:

This is the week where all our images are due as a group. Having six people in my group makes it slightly harder to fit all the images onto the image size we have been assigned. However, we have coordinated it and made a google doc as a group to keep everything ordered and structured.

For the first image, I had to put the Arc de Triomphe into my assigned image which was incredibly hard (everyone in the course who got stitched up by their group to do it found it very hard). Having never really used photoshop before, I needed to learn extremely fast as it was a hard thing to do.

As the image was in a sunset and didn't match the colours of the rest of the image. I had to get the blues out of the image and blend the colour to match the rest of the photo. This is the before and after:


The Teddy Bear in the original image is what caught my eye, as no other group would have it and it almost looks photoshopped already like it isn't meant to be there.


Illustrator is my thing and I enjoy doing it, therefore I was in charge of finishing both illustrator documents, being the infographic and the site plan, here are my individual parts I made: 


Tuesday, March 3, 2020

Week 3

Week 3:

This week we were recording the movement within our site and learning how to create/draw technical drawings. 

The toolbox we made in the maker space badge we had to draw technically in the studio, showing the isometric, front, sides and bottom of the image. Here is the image (got a bit crumpled in my bag which is slightly annoying).
I didn't finish the measurements of the box for the sides and correctly label the different views, however, I feel that it is fairly self-explanatory if I were to add-in labels as I am about to in the next image

Week 3: Movies

Week 3: Movies = Movement

As a part of week three, we recorded movies to show movement within our site, this will help us for the assessment as we can map movement using the pen tool, as explained in Russel's illustrator tutorial for this week. We also measured our site and found it to be roughly 24m by 16m, which we will use for our site plan in the 1080x5400px image.

Here are some videos that I took to show where people move throughout our site regularly. We found that people cut through diagonally on our site to get from building to building easier.


Final Images: Developing your style

Final Images: Developing your style These are all the final images I submitted for grading. I have put them on my blog as I feel it is ne...