Sunday, April 26, 2020

Final Images: Developing your style

Final Images: Developing your style

These are all the final images I submitted for grading. I have put them on my blog as I feel it is necessary for me to show the 'end of the story' and perhaps the end of this blog. 

I took them all (apart from the fusion files) with foam core providing a white background so I could show the difference in the light coming into my workspace in my modified models, as opposed to my original and exact workspace models.  Here they are :) 

As you can see, even as the entire model is black, there is no light coming into the room as the windows are so small.
This is my fifth model, which has bigger windows allowing light to come into the workspace.
I believe this is my second best model as I prefer working with cardboard over the paper as it is rigid and sturdy.
This is my best model and as you can see, light completely comes into the room.

 As you can see, natural light would flood into the room with larger windows.


Light can be seen here but not in the back corner near the windows where my desk is located. If I had natural light, there would be no need for my desk light to be turned on at around 3pm normally.


Week 10

Week 10: FINAL WEEK 

This is the final week of this particular class. This week is the week where we have to submit all our final documents to moodle to be assessed. It's worth 30% of our mark and quite stressful, to be honest. 

I finally finished my initials this week which was a huge relief as it was not letting me shell out my initials. I was originally using the older version of fusion 360 which I downloaded in 2018. This was a huge mistake as the program was horrible and glitchy. However, I resolved this by making a new Autodesk account with my uni email and re-downloaded the newest version of Fusion 360.

Using the new version, my initials eventually shelled the object to have a 0.1mm thickness (as seen below). I think it was so hard to shell because both the 'T' and the 'H' have harsh edges, whereas the 'R' was completely curved. 

This is the rendered image of my initials. I used Rose Gold and stained gold to achieve this.

This is the stress I had to deal with on the older version of Fusion 360. This meant I couldn't shell the object at all as the program could not handle the command.
Finally, I finished the initials on the new version of Fusion 360 which meant I could completely shell the object. However, the shell was only 0.1mm thick which is incredibly thin. This is the Home view.
 Side View
Bottom View


Monday, April 20, 2020

Week 9

Week 9: 

This week was by far one of the hardest weeks this term. I had all three of my classes have assessments due in Week 10 so I needed to get a grip on this BENV1010 class. This week I completed all five of my models. 

However, the fifth model got completely wet when I left my window open and it destroyed it in the rain (as seen below). I remade it out of paper and instead of using tabs, I used folding which I felt was best for me and glue.

I completed my laser cutting file. I found it quite hard to transfer a fusion drawing file over to adobe illustrator at first. However, I got the hang of it and actually watched the tutorials this week that Russel made. I feel that this is a process that I will use in the future of my uni degree and perhaps my career in the future.

I also finished my 100-word statement this week (which is hard to prove unless I want people to see it and copy). 


This is the home view of my laser cut file in Fusion 360, showing the pieces laid out and ready to be made into a drawing.
 A screenshot of my final illustrator file. I followed Russel's tutorial on how to complete this and I feel that it has turned out very well.
These are different views of my Fusion 360 three prism object that would be cut into 3mm plywood if we weren't in isolation.


This is my old model. I was going to make it out of tabs and left it under my window and the window was open :( 


This is the fifth and final model that I made after the catastrophe of nature deciding that my other model was not worthy. It is a 1:50 scaled model that I made. I made it 1:50 as I enjoy using that size with the dimensions of my room as the model is able to sit in my palm.

Monday, April 13, 2020

Week 8

Week 8: Fusion 360

This week I re-learned how to use Fusion 360, which I haven't used in 2-3 years. We had to make our initials and our floor plan of the workspace to make the model.

In the following photos, you can see the progress that I have made towards making both. The initials were easy enough to make on fusion, however, I found the floorplan easier to make in Adobe Illustrator and then export as an SVG file. 

EDIT: I DIDNT WATCH THE TUTORIALS THIS WEEK SO IT PUT ME A WEEK BEHIND SCHEDULE. This meant that my photoshop was pushed back, my 3D file and my laser-cut file had to be done in week 9/10 which is something I never want to do again.

I learned how to do this in Design Tech in High School so I know it should work easily.
I have to twist these initials and make it a different material I'm pretty sure. 

EDIT: YES YOU DID YOU IDIOT

 Flat view of the initials

EDIT: THIS IS MAKING ME CRINGE

 Side view of the initials

EDIT: OH GOD


I have to make the windows also which will provide light like my current cardboard models. 

EDIT: FACEPALMS ðŸ¤¦


Monday, April 6, 2020

Week 6/7

Week 6-7: Coronavirus Peak Isolation

This current week we have been in practically full isolation now. This means that Netflix, running with only one friend and uni, has taken over.

These weeks I have been focusing mainly on my studio class for Industrial Design and this communications course. I have made two 1:50 models out of cardboard. One of which is my room's floorplan currently and the other, being one with and additional source(s) of natural light by increasing the window size. In these images, I have added annotations of what I thought whilst taking pictures of the photo which I thought I should include showing the decisions I made throughout the design process of my workspace model.

This is the first model I made out of cardboard at a 1:50 scale. As seen in the image I used colours to differentiate between the cutting and folding so I would not cut the wrong line by accident.
 This is the first 1:50 model completely cut.
For the second model, I decided to paint the inside and outside of the second cardboard model. The inside is meant to accurately represent the colours in my room and the outside I will paint in black to show the sources in which light enters.

The paint is all acrylic paint which took a while to mix and find the right 'swatch' to use for my room. 

I also thought it was essential for this refined model to cut out a larger desk and bed as it is a change in which I would like to make to my room in the future. As well as the dream of having larger windows.
This is the first model. I found it to be the scale in which I would love to work with for any future models as it was relatively simple to create. I added my bed, cupboard and desk area are in the room. 

All aspects of this model are to scale.
This is the Second Final Model which I will stick with as the model I will photoshop and add the figure to show light.

The following three photos are a comparison between the models to show the changes in which I made to the second model. This allows more natural light to come into the room. I also changed the size of my desk as I would like a better desk.

I also moved my bed around so I can move around my room easily with a bigger desk. I also put in a projector and a painting into the room

Saturday, March 21, 2020

Week 5

Week 5: Activities 

This week I made models of my workspace in both cardboard and paper at a 1:10 scale. Here are the two models I have constructed, both of which had varying degrees of success.
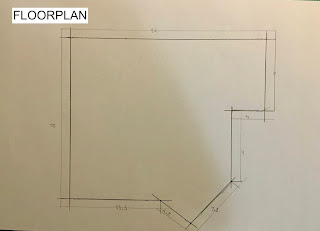
Here is the floorplan which I worked with for my room. I used small tabs on the side to connect the walls to the base using glue and masking tape.


The paper model is not a sturdy model and was extremely annoying to put together completely.

I found cutting was extremely fragile and gluing was tedious as I did not want to leave glue marks on the walls or the base of the model.

The cardboard model was far easier to construct as the base and the walls when putting pieces together were sturdy.

I also spray painted the entire model black to allow for the aesthetics of the model to be increased as there were marks on the old cardboard I used. 

This will also help with taking photos of the model on a white background as I will have a contrast of black and white.

Saturday, March 14, 2020

Final Images

Final Images:

Here are the final images as a group we created. I bought the infographic data visualization image and the site plan to show movement-image together on illustrator.


Final Images: Developing your style

Final Images: Developing your style These are all the final images I submitted for grading. I have put them on my blog as I feel it is ne...